How to Get an Old Sewing Machine Up and Running
Last summer my husband and I went on an anniversary trip and did some thrifting (like ya do). He spotted the cutest vintage Kenmore sewing machine and snapped it up for $10! I finally spent some time with it last week and got it working like a champ, so I thought I’d write some tips for getting these old vintage sewing machines working.
If you have an old machine that you’d like to get running again, or if you’re wondering if you should buy the next vintage sewing machine you stumble across, this post will have plenty of tips for you.
So, read on!
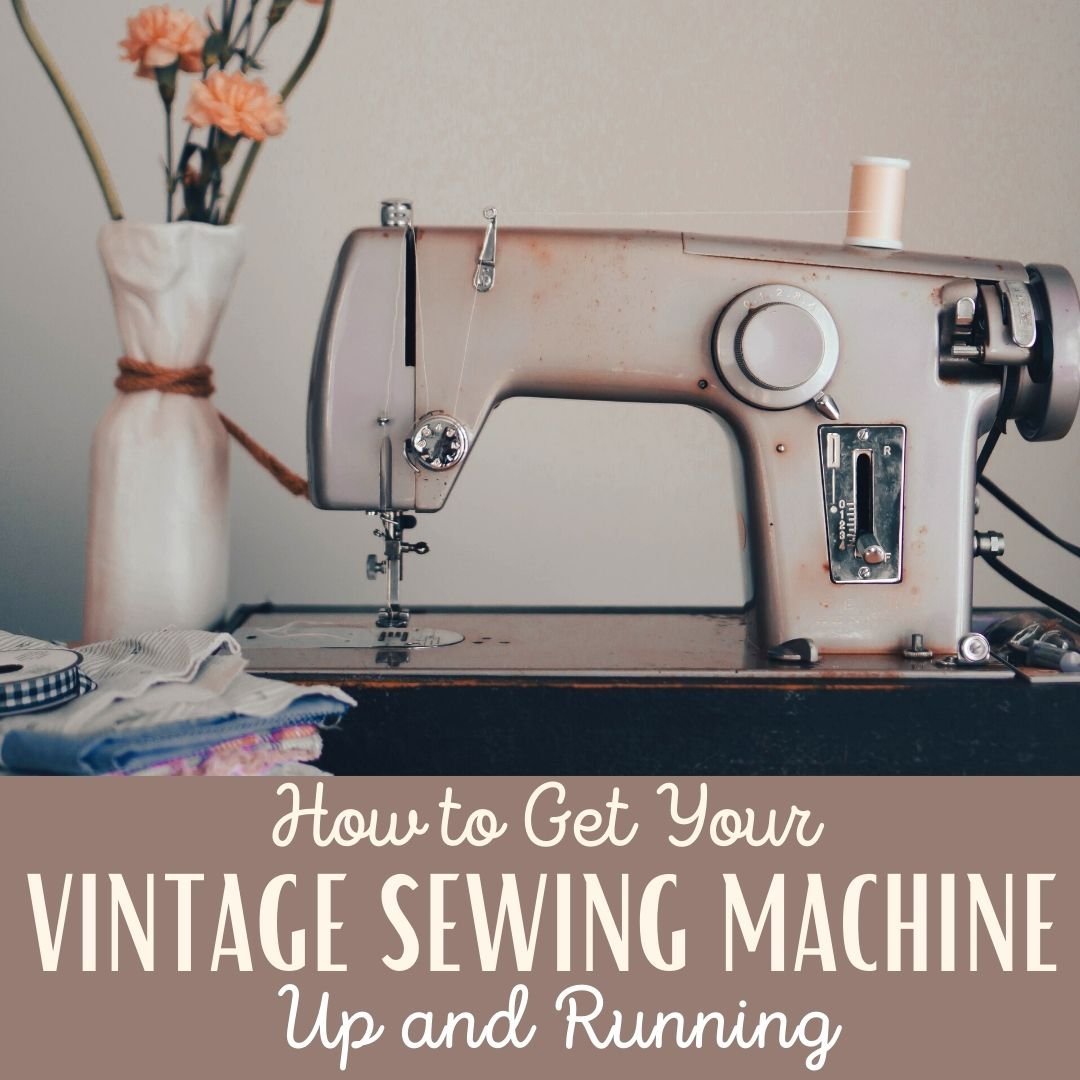
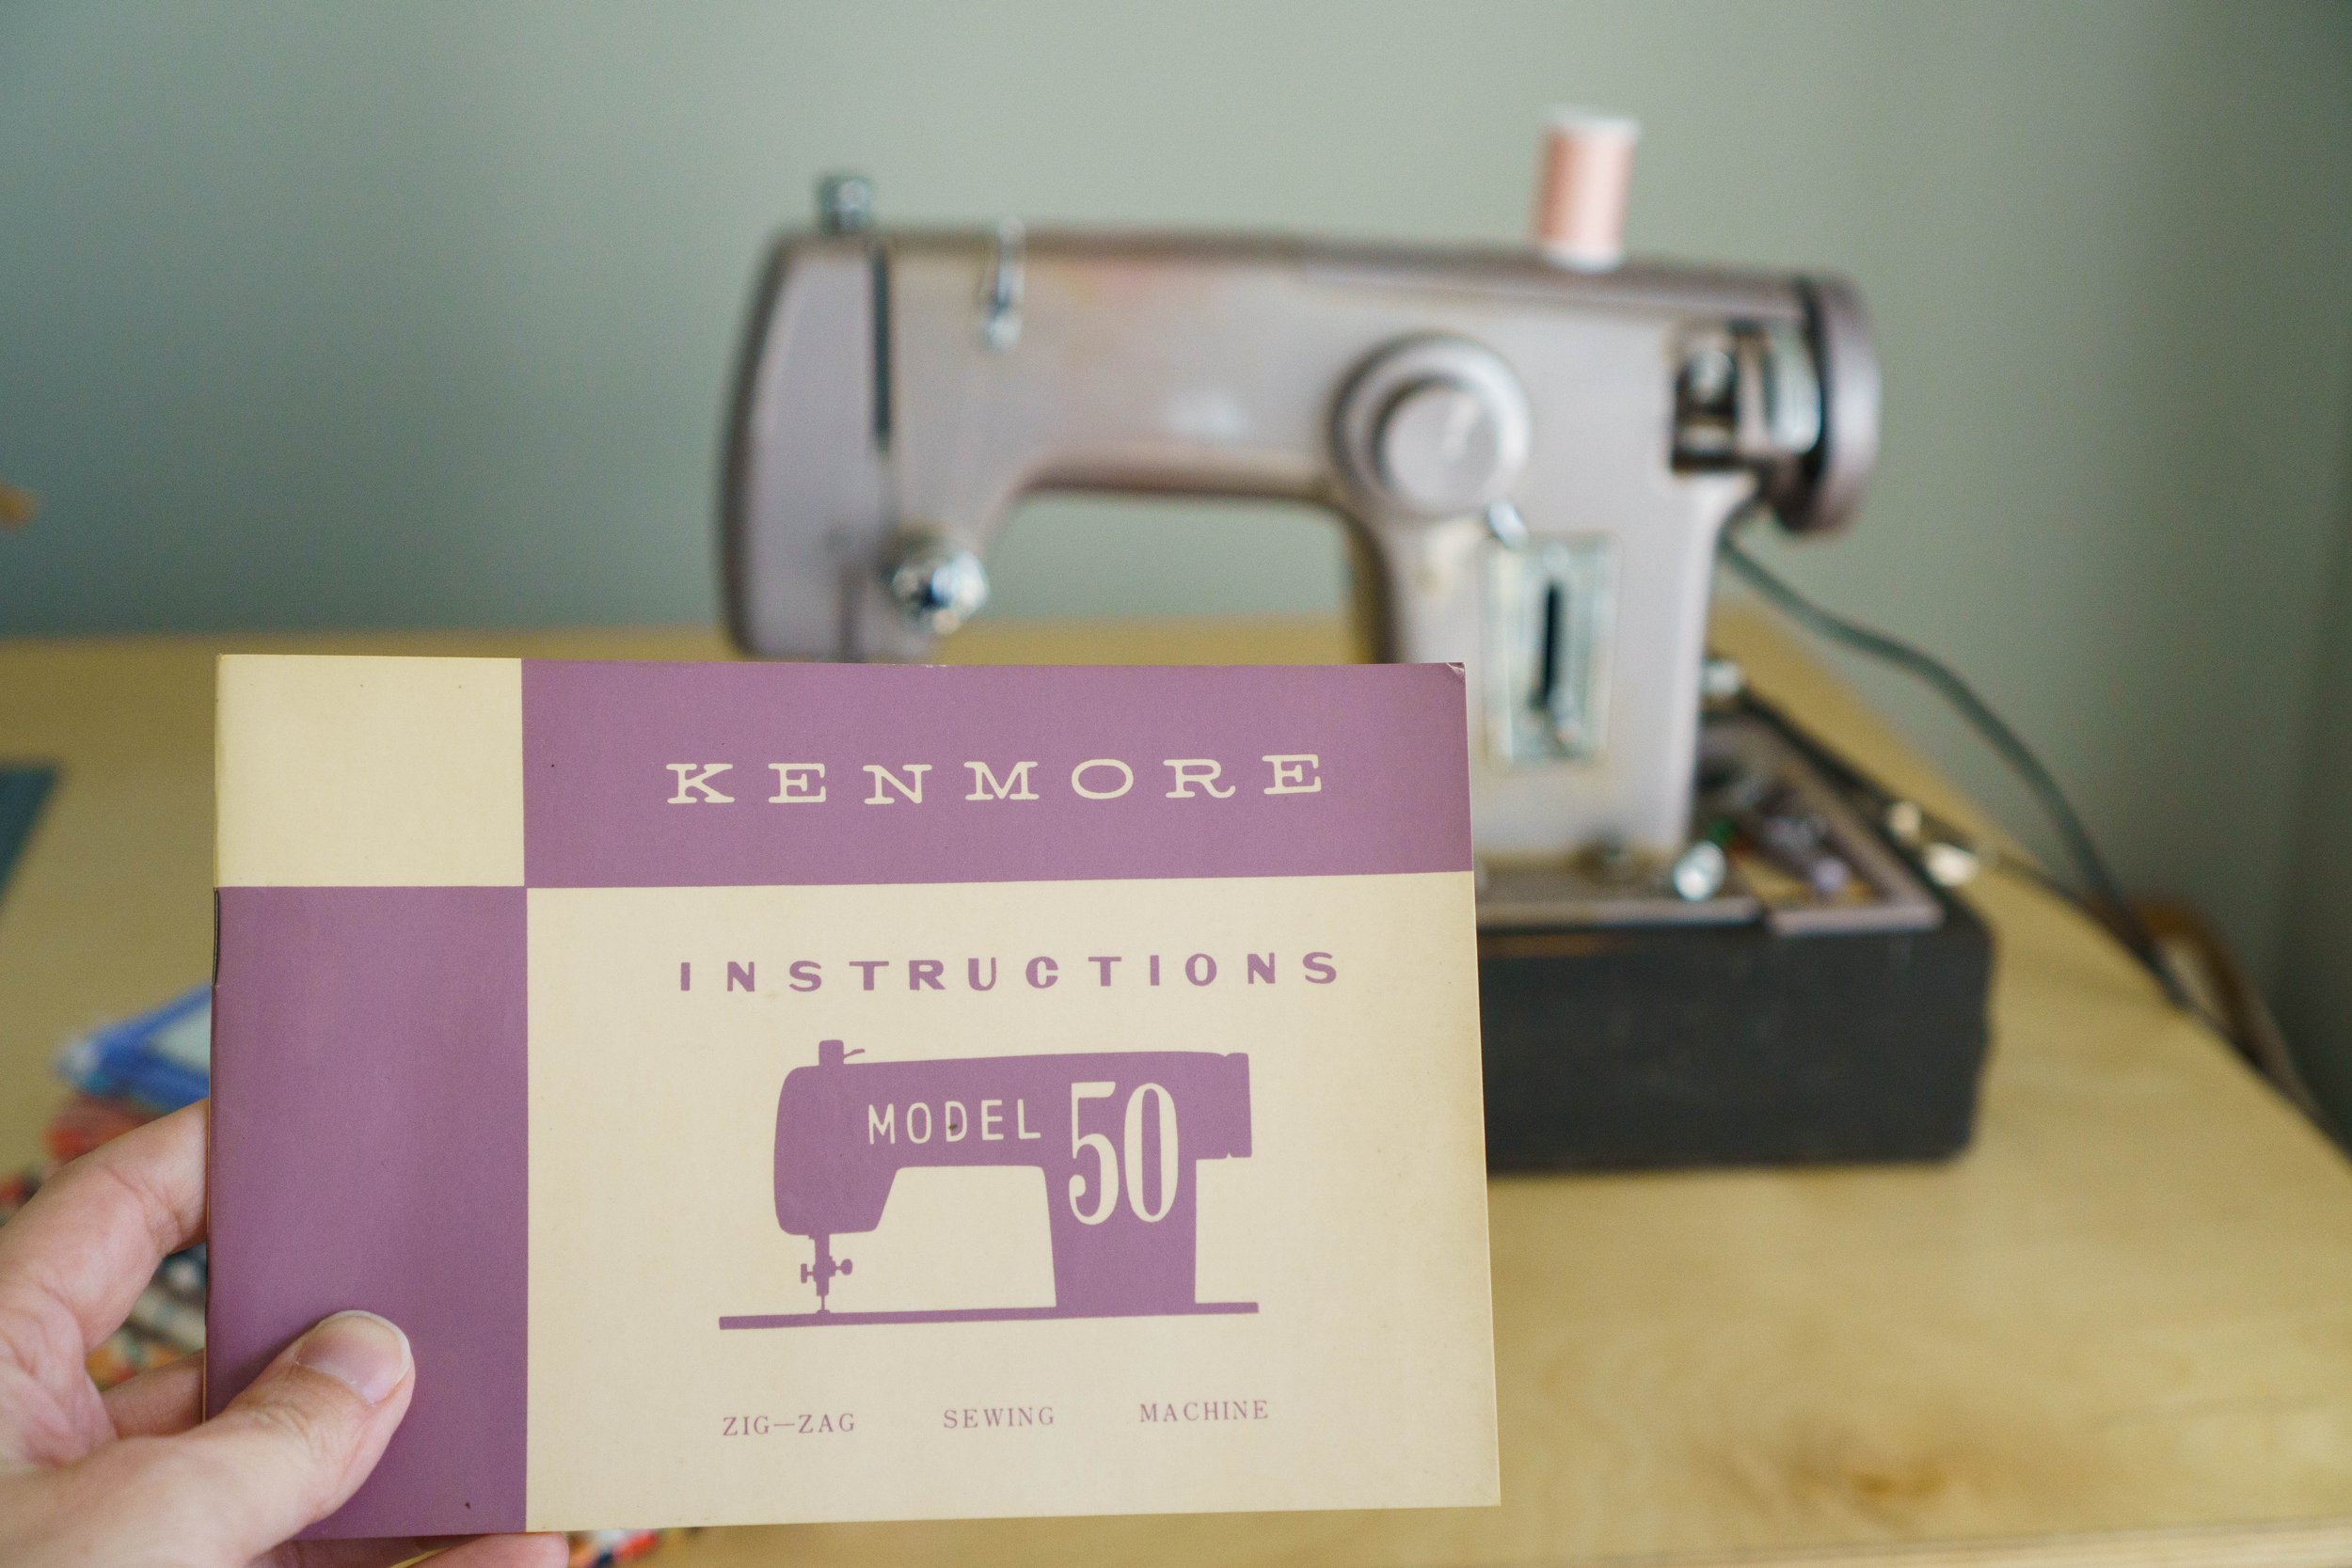
My machine happened to be in great condition and even had the manual inside! It’s a purple Sears Kenmore model from the 50’s and after a little TLC, she purred right along. In this post, I’ll give you tips for how to clean, thread, fix up and sew on a vintage sewing machine, plus how to know whether or not an old machine is worth purchasing and/or repairing.
But first, here’s a video I created as I got my machine working in real time. When I filmed this, I had not even plugged the machine in, so I truly had no idea if she’d work or not!
This post may contain affiliate links, which means that while I am not paid to promote certain items, I will earn a small commission should you purchase items through these links. For more info, see my disclosure policy.
Are Old Sewing Machines Worth Repairing?
If you have a vintage machine lying around and are wondering if you should even bother trying repair it, the answer is YES! I know the phrase, “they don’t make them like that anymore,” sounds so cliche, but in the case of sewing machines, it is so true. My most reliable machines are my oldest ones. Kinda like the 1969 oven I cooked on in the first house we ever bought (also Kenmore, coincidentally), these old machines are solid and have metal parts. The stitch quality is unbeatable, they can handle much thicker fabrics than the computerized machines of today can, and they will be work horses for many more decades, if kept clean and maintained.
Can You Actually Use an Old Sewing Machine?
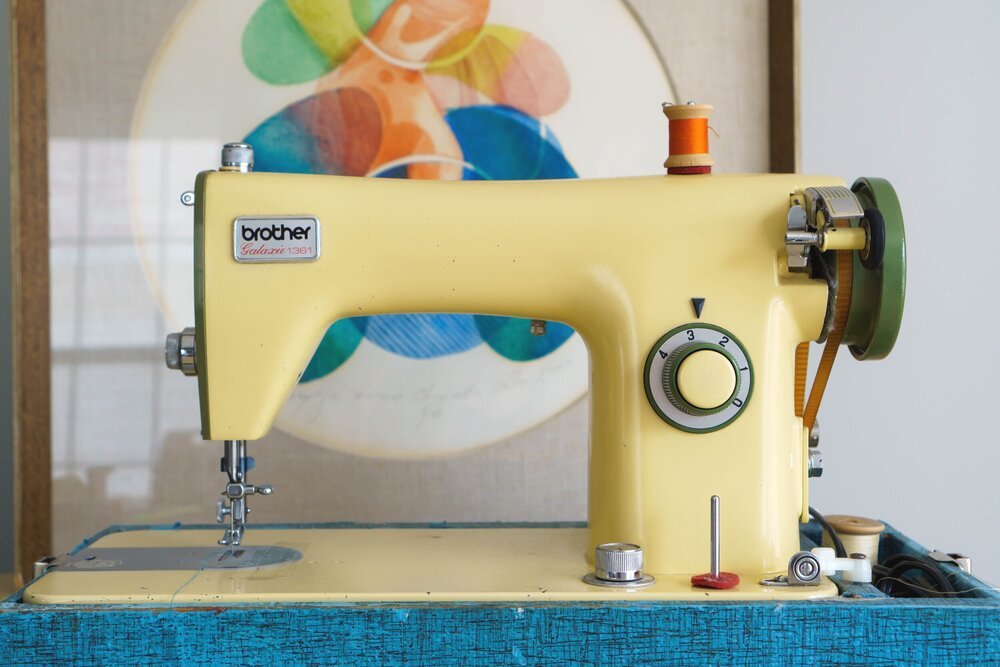
Again, the answer is YES. I sewed on a yellow Brother machine from the late 60’s as a teenager (it was my mom’s that she got for her 13th birthday!) and that continued to be my backup machine for many years into my marriage. That machine will always be special to me. But, right after I got my “new” purple machine working (I named her Fran because that name was written on the outside of the cover she came with), I got busy working on doll clothes for my newest pattern release, and since Fran was still on my cutting table, I sewed the doll clothes on her. She ran beautifully and worked like a champ, not to mention just being plain cool to use!
Your vintage sewing machine may be even older, possibly a true antique. Even if yours is a treadle machine with the cool table and back and forth foot pedal, you can definitely use that machine to sew on! My Granny sewed on a machine like that when I was a kid. I’m sure she probably owned a newer machine and I remember that she had a modern serger, but she still sewed on the old treadle Singer. She just preferred it!
Steps to Getting an Old Machine Working
First, you need to clean the machine up. Use a damp rag to clean the outside of the machine and then open it up wherever you can, and dust the lint out of all the insides with a special lint brush. You may have heard the advice to use compressed air to blow debris out of the machine, but professionals do NOT recommend doing that, as it really just blows debris and dust further in. Use the lint brush instead and get all the nooks and crannies. Don’t forget to take out the bobbin case and get in there too. Unscrew and remove the throat plate and clean out under that also.
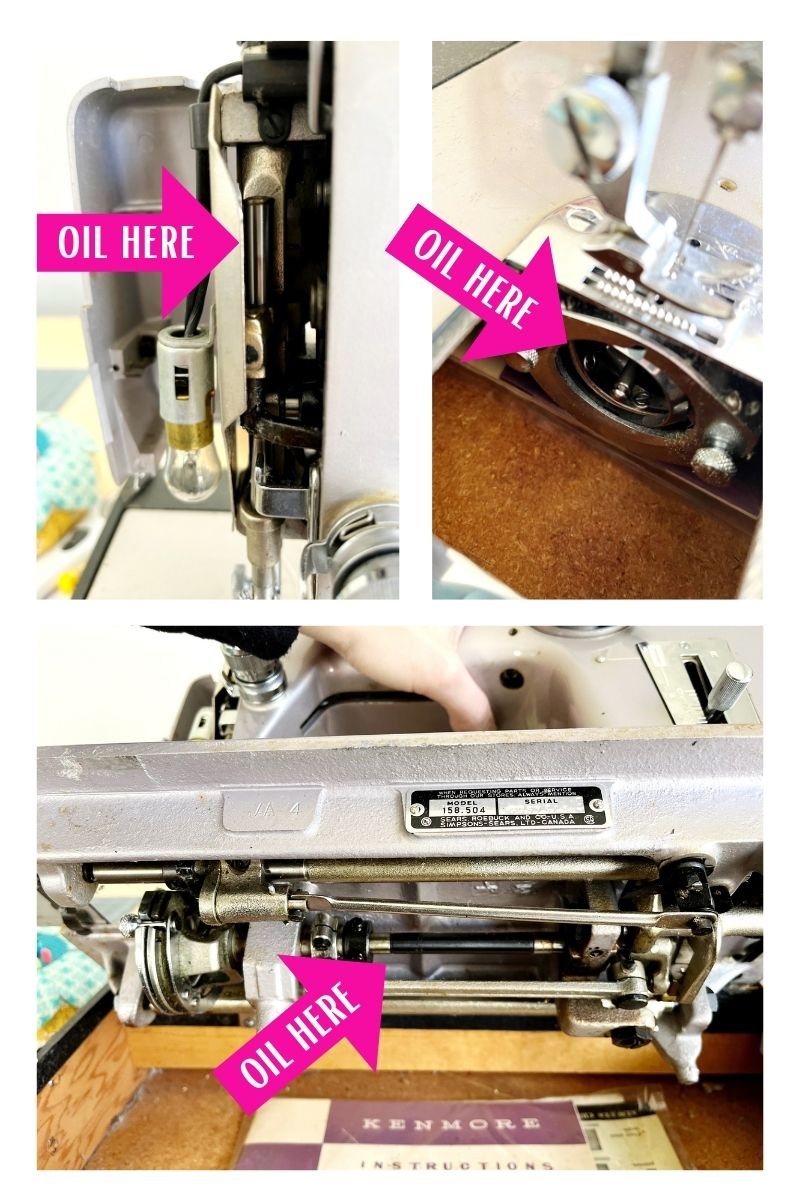
Next, your machine will definitely need oiled. This is a very important step and you’ll notice how the machine’s sound will improve and be less clunky after you oil it and the oil gets worked through the parts. You can buy special sewing machine oil to keep on hand. Machines need oiled every 6 months in my experience, while some may need it even more often. Anywhere there are moving parts need oiled. In the top of the machine, you’ll see a few rods that move up and down or back and forth as you move the hand wheel. Put a drop of oil on those rods. Your bobbin area also needs oiled. Put a drop at the edge of the bobbin case holder and rotate the hand wheel several times so the oil gets worked in. Then, if your machine tilts backward in its case like mine does, look underneath for more rods and oil those too. (Oil the machine without it being plugged in).
Lastly, replace the needle and thread. My machine had a needle and thread already on it, but I replaced both. A fresh needle is always a good idea, and while those vintage thread spools look cool, thread becomes brittle with age, so set yourself up for success and replace it with some modern all purpose thread.
Okay, time to try sewing!
First you’ll need to wind a bobbin. This will be different with each machine, so you’ll need the manual for yours if you’re totally lost. Many from the same era as mine, the 50s or 60s, will wind the bobbin similarly, so watching my video may help you understand how it works, but if you just can’t figure it out, and you don’t have the manual for your machine, you’ll need to hunt down the manual online.
Where to Find Sewing Machine Manuals Online
If you’re not one of the lucky ones whose machine still has its manual, don’t fret. Most sewing machine manuals are available for free online and you can download and print them. The best bet is to locate the model # of your machine and just do a Google search for the manual. You’ll need the model number, of course, which can usually be found very easily somewhere on the front of the machine, or in the case of my purple machine, it’s on a metal plate underneath.
You could also search for your machine manual here at sewingpartsonline.com. This is an amazing resource for not only manuals, but for replacement parts! Basically, if the manual is out there, they’ll have it and many are even free to download and print. If you do not see your specific machine, try searching through the correct brand for a picture of a machine from the same era. It is likely to function in mostly the same way. There really wasn’t a ton of variation in these older machines, so chances are the models surrounding yours will wind a bobbin similarly to yours.
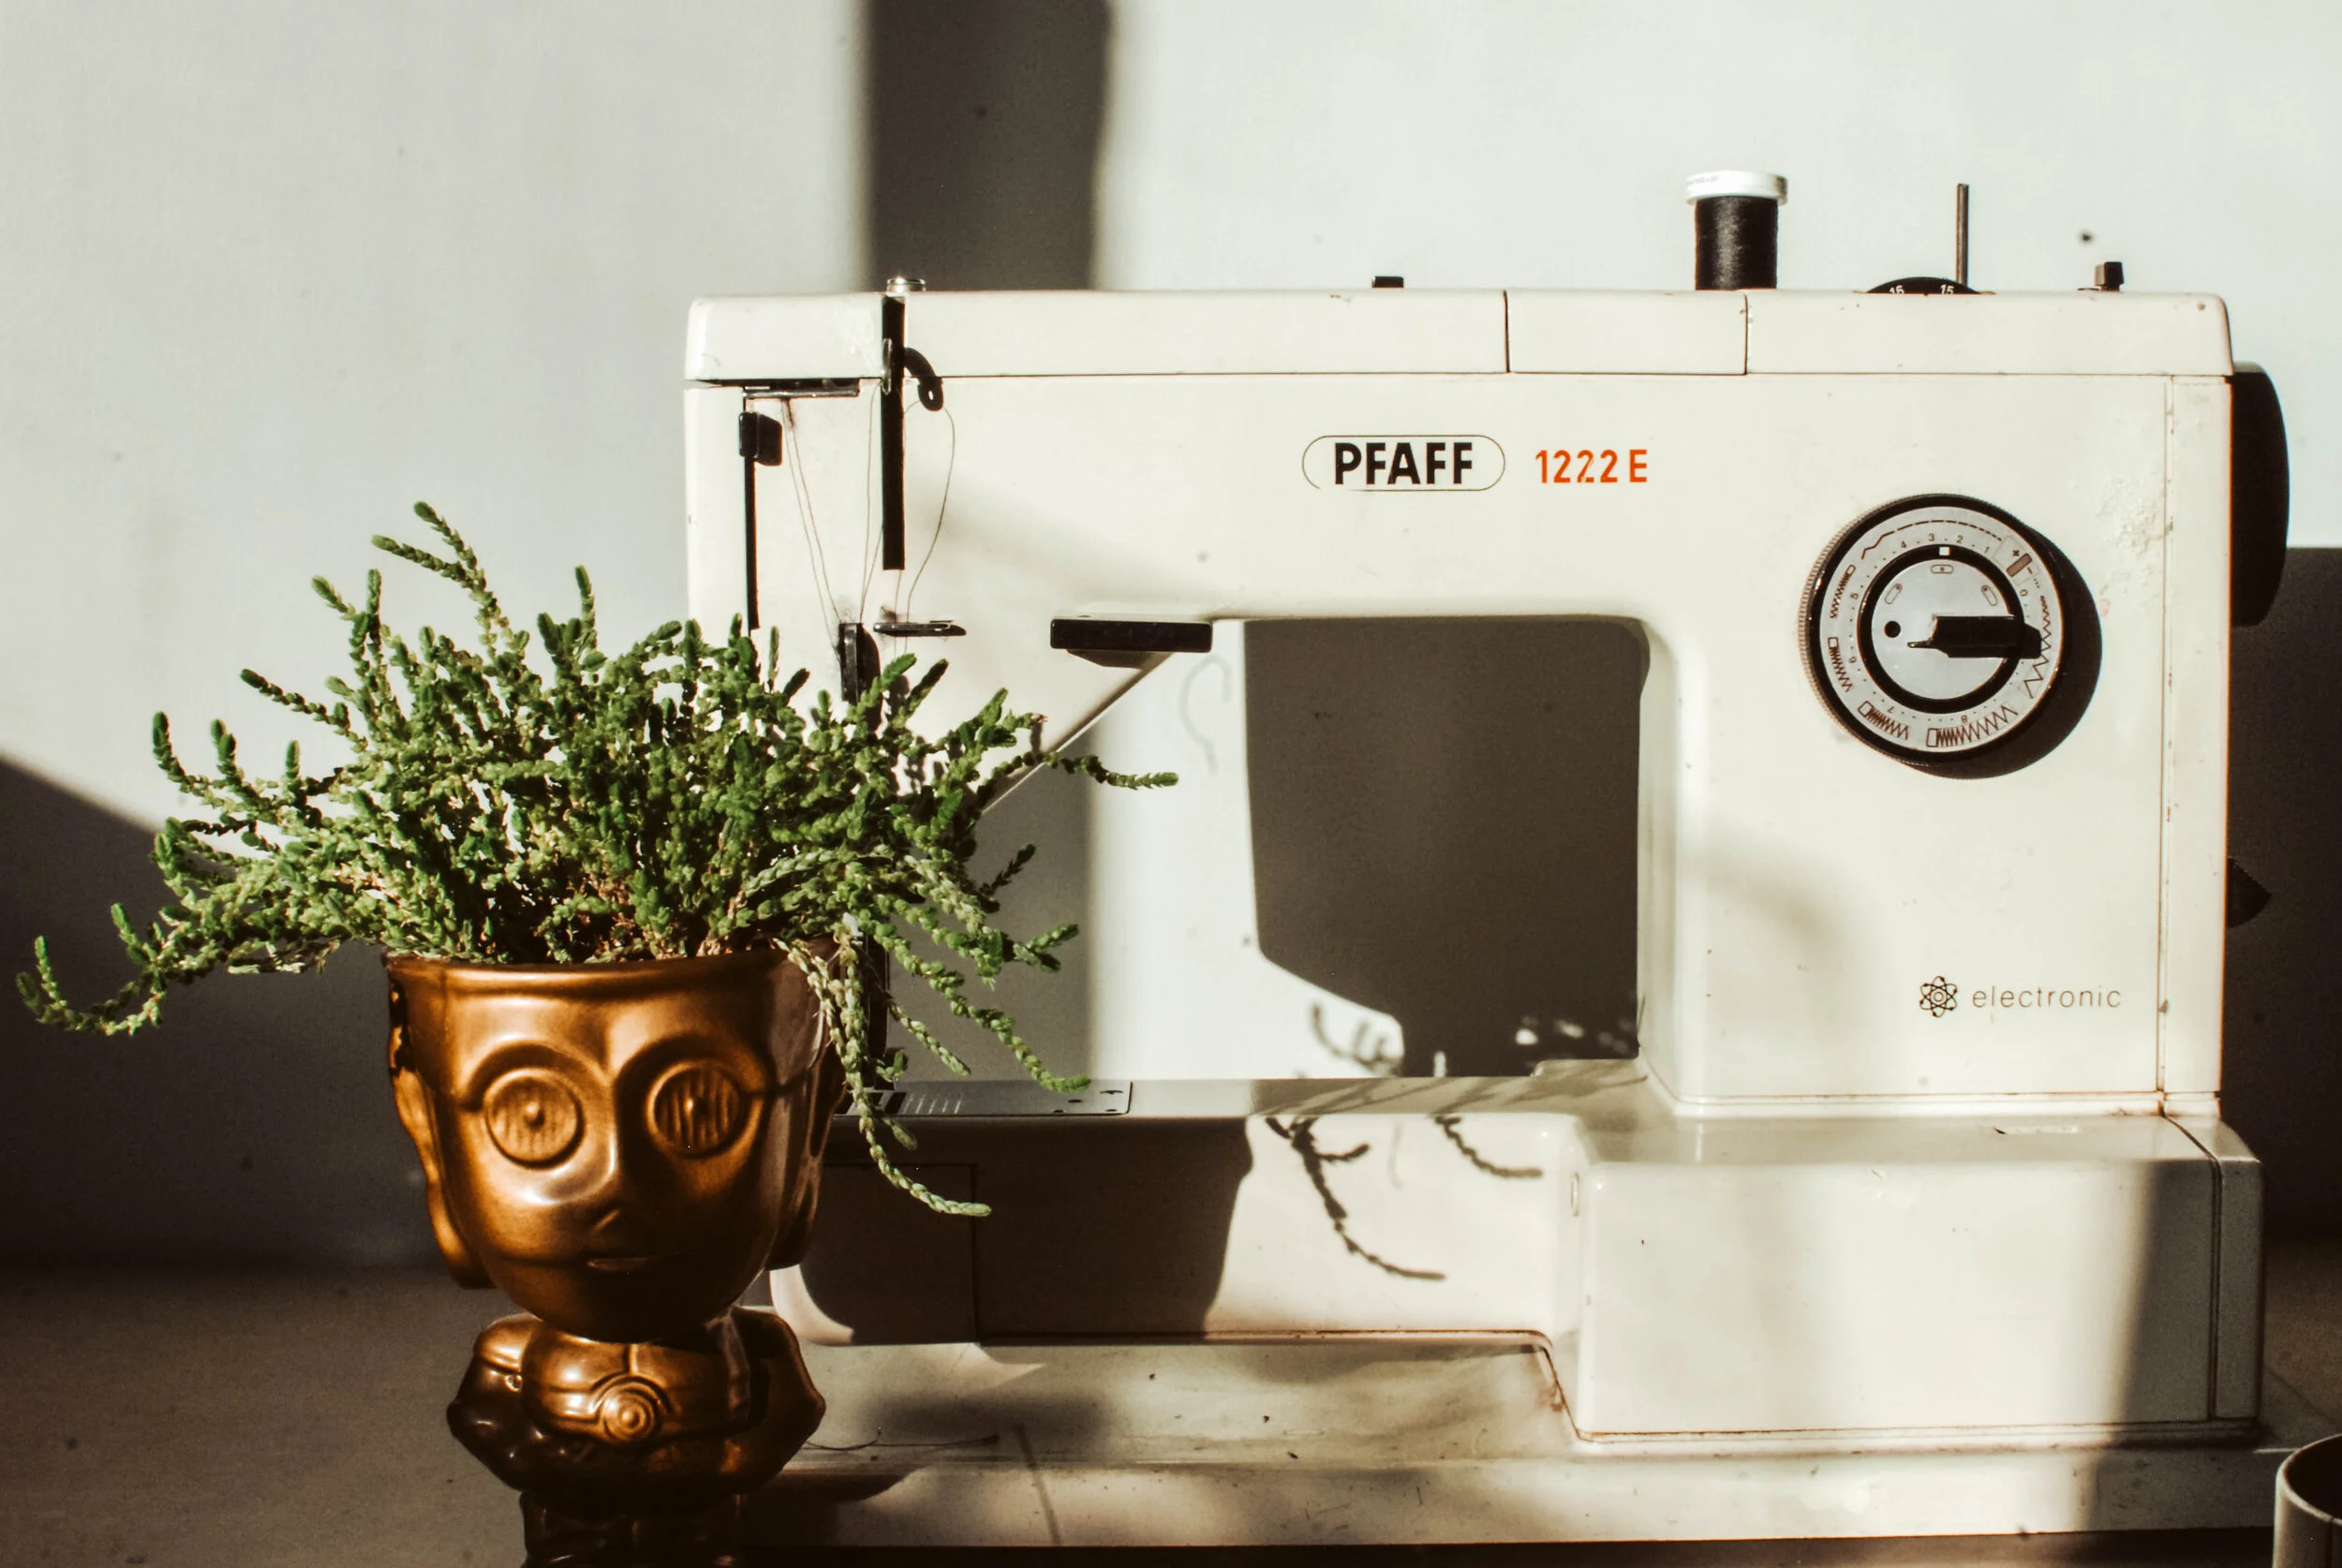
As an experiment, I set out to find the manual online for a few of my own sewing machines. I started with my vintage yellow Brother. Then moved on to my 60’s Pfaff, then my 90’s Pfaff. I was able to find both Pfaff manuals as free downloads, no problem. The Brother was much harder, though. I wasn’t able to find it, but when I searched the model number, a few great video tutorials on threading and using vintage Brother machines came up that would have definitely got me going with mine if I needed the help. So don’t discount the power of YouTube if you simply can’t find the manual or find the sometimes sparse old manual instructions insufficient.
To my surprise, I was able to easily locate a physical copy of the manual for my purple Kenmore online for $20! Mine has the manual, though, so I don’t need it, but that does prove that it’s worth checking.
Okay, time to try it out! Plug your machine in. You’re threaded and have your new needle and modern thread. Be sure and practice on plenty of scraps since you just oiled the machine and it takes some time for the oil to work itself through. You may notice oil on your fabric as you sew, so use scraps until that stops.
When I got my machine purring, it was so clunky at first! But as the oil worked its way into all the moving parts, it got quieter and smoother and now she makes much less noise.
What if it doesn’t work?
If you’re sure you’ve threaded the machine properly and it’s just not working or isn’t sewing correctly, there are some troubleshooting steps you can take. Definitely make sure the stitch length and tension are at normal settings. Also make sure the feed dogs are up, since these old machines were often used for darning, so the feed dog setting was more prominent on them. Make sure you’re not set to a zig zag or buttonhole or something like that. Mine was set to a zig zag stitch, but that wasn’t evident anywhere on the outside of the machine, so I had to refer to the manual.
If all of that doesn’t work, the next step is a repair person. If you can’t find a shop that repairs old machines, look for someone locally who repairs appliances and other things. My dad could easily have a side gig working on sewing machines! For old sewing machines, you don’t necessarily need a specialist, but you do need someone who understands machines in general and has knowledge of how sewing machine timing works.
How to Know if an Old Sewing Machine is Worth Buying
I have some general advice for when to buy an old sewing machine and when to pass.
Don’t Buy Site Unseen
In general, I don’t buy sewing machines site unseen. I got burned buying a serger on Ebay once and it didn’t work. It had rusted parts inside and there was really nothing I could do. That was my last time buying a machine without seeing and trying it first!
Ask for a Demonstration
Funny story: I sold some basic machines when I stopped teaching kids classes and preferred to meet people at neutral places rather than having them come to my house. One guy brought a portable generator and plugged it into his truck so he could plug the machine in and make sure it worked! Haha! I laughed a little then, but it makes sense. When buying on Facebook marketplace or something like that, you want to eliminate risk of being scammed. So if you buy a machine from someone local and they claim it works, make sure that’s actually true.
I bought my 60’s Pfaff on Craigslist for $400 and have never regretted it. It’s been an amazing machine. The seller was able to prove to me that it had been recently serviced and oiled. She demonstrated it for me and let me thread and use it before I decided, so I felt super confident purchasing it from her.
And if it doesn’t work, the price better be right! I wouldn’t pay more than $20 for a machine that advertises it might not be in working condition. Some people seem to think vintage machines are valuable just because they’re vintage, and try to sell them for more than they’re worth. It can cost you a lot to get it in working condition if you have to get it professionally serviced, so to spend a lot for a machine that doesn’t work doesn’t make a lot of sense.
Buying Machines from Thrift Stores
Thrift store machines carry more risk because you don’t know why it’s been donated. But, thrift stores do have power outlets and most will let you borrow extensions cords so you can at least plug it in and see if the machine turns on. I’d even try the foot pedal to see if the motor runs. If the motor works and you don’t see obvious rust, consider purchasing it if the price is right! Depending on the machine, I probably wouldn’t pay for than $50 at a thrift store. But that’s obviously up to you.
I spotted the coveted Singer Featherweight at an antique store recently, but they wanted $150 for it. I could have (and should have!) asked to see if it actually worked and if I could try it out. If it had worked, since I know that’s a valuable machine, I probably would have considered paying that price. So, I guess what I’m saying is that how much you should risk spending on a used machine just really depends on the machine! I mean, if I saw a newer Bernina or something, I’d snap that right up, haha. Even if it needs serviced, that’s a really nice machine for a thrift store price!

Whew! I hope this has been helpful! While I can’t speak to each specific machine or issue, these tips will hopefully get you started or give you courage to get out your old machine and try using it. And hopefully you’ll also keep your eyes peeled when you’re out thrifted or yard saling, because you never know what gems you might find out there!
Cheers :)
Nikki